Spotlight Component
Learn everything there is to know about the Spotlight Component.
Install the spotlight base component
Add the component service provider to your config/app.php to ensure the required assets are loaded.
1'providers' => [ 2 3 /* 4 * Laravel Framework Service Providers... 5 */ 6 Illuminate\Auth\AuthServiceProvider::class, 7 8 /* 9 * Package Service Providers...10 */11 WireElements\Pro\Components\Spotlight\SpotlightServiceProvider::class,12]
To use the spotlight component, you must add the spotlight base component @livewire('spotlight-pro') to every page of your application where you want to be able to use the
spotlight—for example, resources/views/layouts/app.blade.php
1<!DOCTYPE html> 2<html> 3<head> 4 <meta charset="utf-8"> 5 <meta name="viewport" content="width=device-width, initial-scale=1"> 6 7 <title>Laravel</title> 8 9 @livewireStyles10</head>11<body>12 13 <!-- Require the Spotlight Pro component -->14 @livewire('spotlight-pro')15 16 @livewireScripts17</body>18</html>
Add the @livewire('spotlight-pro') directive to your layout.
Compile Javascript
This component requires some additional Javascript so ensure this is compiled by requiring the script in your resources/js/bootstrap.js:
1import '../../vendor/wire-elements/pro/resources/js/spotlight-component.js'To compile you will also need to install the following NPM dependencies:
npm i @alpinejs/focus
It’s also possible to include the required resources directly; see the following next step.
Include Javascript and CSS directly
You can include Javascript and CSS (Bootstrap only) directly by publishing the package assets. If you are using the Boostrap preset, you must include the additional CSS.
1php artisan vendor:publish --tag=wire-elements-pro-assets2 3Copied Directory [/wire-elements-pro/resources/dist] To [/public/vendor/wire-elements-pro]4Publishing complete.Publish package assets.
1<!DOCTYPE html> 2<html> 3<head> 4 <meta charset="utf-8"> 5 <meta name="viewport" content="width=device-width, initial-scale=1"> 6 7 <title>Laravel</title> 8 9 <!-- Include the spotlight-component.css stylesheet -->10 <link rel="stylesheet" href="{{ asset('vendor/wire-elements-pro/css/bootstrap-spotlight-component.css') }}">11 12 @livewireStyles13</head>14<body>15 16 <!-- //.... -->17 18 <!-- Include the spotlight-component.js script -->19 <script src="{{ asset('vendor/wire-elements-pro/js/spotlight-component.js') }}"></script>20</body>21</html>Make sure to republish assets when you update the package.
Tailwind CSS configuration
If you use Tailwind as your CSS framework, it’s essential to include the Wire Element components in the contents array. Add the following paths to the content array to ensure the required CSS is generated.
1module.exports = {2 3 content: [4 './vendor/wire-elements/pro/config/wire-elements-pro.php',5 './vendor/wire-elements/pro/**/*.blade.php',6 ],7 8 //....9};Configure the tailwind.config.js content array
Chances are you want to make changes to the look and feel of the modal. Publishing the views is one possibility, but staying up to date with any changes will be more time-consuming. For that reason, the Tailwind CSS is in a separate file, so you can make adjustments without the need to edit the blade file. Even if you don't want to make any changes, you must include the CSS like this:
1@import "../../vendor/wire-elements/pro/resources/css/tailwind/spotlight-component.css"; 2@tailwind base; 3@tailwind components; 4@tailwind utilities; 5 6// Add your customizations here 7 8// Example: Disable the transition animation when reduced motion is enabled 9.wep-modal-content,10.wep-slide-over-container-inner-wrap {11 @apply motion-reduce:transition-none;12}
Add the import statement to your resources/css/app.css
Configuration
If you want to make any configuration changes to the spotlight component, you will need to publish the config file using the following command:
1php artisan vendor:publish --tag=wire-elements-pro-config2 3Copied File [/wire-elements-pro/config/wire-elements-pro.php] To [/config/wire-elements-pro.php]4Publishing complete.Publish the Wire Elements Pro configuration file
The config file contains the default spotlight behavior and attributes. The different behaviors and attributes are explained further along in this document.
Using Bootstrap as your front-end framework
If you are using Bootstrap as your front-end framework, you will have to change the preset from Tailwind to Bootstrap:
1return [2 'default' => 'bootstrap',3 4 // ...5];Configuring your Spotlight default results
The first thing you will likely want to do is define the default results when someone opens Spotlight.
In this example we will show various static pages and Eloquent models. We can achieve this by registering
Spotlight Queries. Queries are at the core of the Spotlight component and will allow you to return
the default, specific command palette mode and token results. These
different options will be covered below.
Let's start by creating our first default query. We can do this inside the register method in our AppServiceProvider.php.
If you want to access the request object, the authenticated user, or other objects from the container you need to wrap your method calls inside the setup callback.
1class AppServiceProvider extends ServiceProvider 2{ 3 /** 4 * Register any application services. 5 * 6 * @return void 7 */ 8 public function register() 9 {10 // Method 1 - Here you will have access to all resolved objects from the container.11 12 Spotlight::setup(function () {13 14 // Here you can access the user, request, etc.15 // auth()->user() // Returns current user16 17 Spotlight::registerQueries(18 SpotlightQuery::asDefault(function ($query) {19 // Return default results20 });21 );22 });23 24 // Method 2 - Here you can't access the user, request, etc.25 26 // auth()->user() // Returns null27 28 Spotlight::registerQueries(29 SpotlightQuery::asDefault(function ($query) {30 // Return default results31 });32 );33 }34}The `SpotlightQuery` objects expect an `Collection` of `SpotlightResult` objects. Let's start by returning a few static pages.
1class AppServiceProvider extends ServiceProvider 2{ 3 /** 4 * Register any application services. 5 * 6 * @return void 7 */ 8 public function register() 9 {10 Spotlight::setup(function () {11 Spotlight::registerQueries(12 SpotlightQuery::asDefault(function ($query) {13 $collection = collect();14 15 $collection->push(16 SpotlightResult::make()17 ->setTitle('Dashboard')18 ->setAction('jump_to', ['path' => '/'])19 );20 21 return $collection;22 });23 );24 });25 }26}
If you open Spotlight using CMD + K or CONTROL + K you should see the Dashboard result show up.
Let's dive further into the `SpotlightResult` object. Firstly, you must always define a title and action. Next, we have various properties we can set:
setTypeahead()- This value will be shown as the input placeholdersetGroup()- Push the result into a different group (you must register groups separately).setIcon()- Set an SVG icon for the result (you must register custom icons separately).setImage()- Set a remote image for the result instead of an icon.setView()- Set a custom Blade view to use to render this result.
If we add this to our example from earlier, we get something as follows:
1Spotlight::setup(function () { 2 Spotlight::registerQueries( 3 SpotlightQuery::asDefault(function ($query) { 4 $collection = collect(); 5 6 $collection->push( 7 SpotlightResult::make() 8 ->setTitle('Dashboard') 9 ->setTypeahead('Dashboard')10 ->setGroup('pages')11 ->setAction('jump_to', ['path' => '/'])12 ->setIcon('home')13 );14 15 return $collection;16 }),17 );18});Wire Elements Pro includes the Heroicons but if you want to register custom icons you will have to create a new class and assign it to a key in the config file.
1 use WireElements\Pro\Icons\Icon; 2 3 class MyIcon extends Icon 4 { 5 public function svg(): string 6 { 7 return <<<'blade' 8 <svg fill="none" stroke="currentColor" viewBox="0 0 24 24" xmlns="http://www.w3.org/2000/svg"><path stroke-linecap="round" stroke-linejoin="round" stroke-width="2" d="M3 12l2-2m0 0l7-7 7 7M5 10v10a1 1 0 001 1h3m10-11l2 2m-2-2v10a1 1 0 01-1 1h-3m-6 0a1 1 0 001-1v-4a1 1 0 011-1h2a1 1 0 011 1v4a1 1 0 001 1m-6 0h6"></path></svg> 9 blade;10 }11}
You can now add your icon to the wire-elements-pro.php config file.
1return [ 2 'default' => 'tailwind', 3 'components' => [...], 4 'presets' => [...], 5 'icons' => [ 6 'my-icon' => MyIcon::class, 7 'repository' => RepositoryIcon::class, 8 9 // All Heroicons10 'academic-cap' => WireElements\Pro\Icons\AcademicCap::class,11 'adjustments-horizontal' => WireElements\Pro\Icons\AdjustmentsHorizontal::class,12 // ...13 ],14]As you can see, the config also includes all the Heroicons. Next, we want to register our group as well.
1class AppServiceProvider extends ServiceProvider2{3 public function register()4 {5 Spotlight::registerGroup('pages', 'Pages');6 7 // ...8 }9}You can repeat the process to add additional pages.
1Spotlight::registerQueries( 2 SpotlightQuery::asDefault(function ($query) { 3 $collection = collect(); 4 5 $collection->push( 6 SpotlightResult::make() 7 ->setTitle('Dashboard') 8 ->setTypeahead('Dashboard') 9 ->setGroup('pages')10 ->setAction('jump_to', ['path' => '/'])11 ->setIcon('home'),12 SpotlightResult::make()13 ->setTitle('Repositories')14 ->setTypeahead('Repositories')15 ->setGroup('pages')16 ->setAction('jump_to', ['path' => route('repositories')])17 ->setIcon('repository'),18 );19 20 return $collection;21 }),22);
By default, Spotlight ships with three actions out of the box. Actions define the behavior when a result is selected. The jump_to action, for example, will redirect users to the given path.
You can create your own actions as well. Let's take a look at the JumpTo class:
1class JumpTo extends SpotlightAction 2{ 3 public string $path; 4 5 public string $description; 6 7 public function __construct(string $path, string $description = 'Jump to') 8 { 9 $this->path = $path;10 $this->description = $description;11 }12 13 public function description(): string14 {15 return $this->description;16 }17 18 public function execute(Spotlight $spotlight)19 {20 $spotlight->redirect($this->path);21 }22}
When you create an action you must add a description, this will be shown to the user, and implement the execute method.
This method gives you access to the Spotlight Livewire component. Which allows you to, for example, redirect your user.
To register your own actions you can use the `registerAction` method.
1Spotlight::registerAction('jump_to', JumpTo::class);
Let's take a look at another action, DispatchEvent. This action allows you to dispatch events when the action is triggered. You can for example use this to open a modal.
1SpotlightResult::make() 2 ->setTitle('Edit Product') 3 ->setAction('dispatch_event', [ 4 'name' => 'modal.open', 5 'data' => [ 6 'edit-product', 7 ['productId' => $product->id] 8 ], 9 // The following two options are useful when triggering destructive actions.10 // For example, when a user scope is applied, you want to remove this scope if the user11 // uses a Spotlight command to trigger te deletion of a user.12 13 // If you set clearScope to true, the scope will be cleared if Spotlight is opened again14 // 'clearScope' => true,15 16 // If popScope is true, the scope will move up one level if Spotlight is opened again17 // 'popScope' => true,18 ])
You may have noticed that when you start typing a query, the results are not updated. This is because we haven't implemented any search behavior for our static pages.
We can implement the search behavior using our existing Collection.
1Spotlight::registerQueries( 2 SpotlightQuery::asDefault(function ($query) { 3 $collection = collect(); 4 5 $collection->push( 6 SpotlightResult::make() 7 ->setTitle('Dashboard') 8 ->setGroup('pages') 9 ->setAction('jump_to', ['path' => '/'])10 ->setIcon('home'),11 SpotlightResult::make()12 ->setTitle('Repositories')13 ->setTypeahead('Your Repositories') // If you want to set a different typeahead (placeholder in the input field)14 ->setGroup('pages')15 ->setAction('jump_to', ['path' => route('repositories')])16 ->setIcon('repository'),17 );18 19 $collection = $collection->when(!blank($query), function ($collection) use ($query) {20 return $collection->where(fn(SpotlightResult $result) => str($result->title())->lower()->contains(str($query)->lower()));21 });22 23 return $collection;24 })25);
In the example above, we filter our collection if the title of our result contains a part of our search query.
We also make sure the $query is not empty to ensure all pages are shown by default when no search query was provided.
Next, we might want to add some dynamic results from our database as well. The process is the same but in this case we will use Eloquent and merge the results into our collection.
1Spotlight::registerQueries( 2 SpotlightQuery::asDefault(function ($query) { 3 $pages = collect([ 4 SpotlightResult::make() 5 ->setTitle('Dashboard') 6 ->setGroup('pages') 7 ->setAction('jump_to', ['path' => '/']) 8 ->setIcon('home'), 9 SpotlightResult::make()10 ->setTitle('Repositories')11 ->setTypeahead('Your Repositories')12 ->setGroup('pages')13 ->setAction('jump_to', ['path' => route('repositories')])14 ->setIcon('repository'),15 ])->when(!blank($query), function ($pages) use ($query) {16 return $pages->where(fn(SpotlightResult $result) => str($result->title())->lower()->contains(str($query)->lower()));17 });18 19 $repositories = Repository::query()20 ->when(!blank($query), fn($q) => $q->where('name', 'like', "%{$query}%"))21 ->get()->map(function ($repository) {22 return SpotlightResult::make()23 ->setTitle($repository->name)24 ->setGroup('repositories')25 ->setAction('jump_to', ['path' => route('repository.show', $repository)])26 ->setIcon('repository');27 });28 29 return collect()->merge($repositories)->merge($pages);30 })31);You will now see both the pages and repositories listed in the results.
Scopes and tokens
Scopes and tokens allow you to make the command palette context aware.
Let's assume our application also has a repository.show route that shows details about our repository.
When this route is active we want Spotlight to show actions and resources related to our repository.
First, we need to register a scope token. You can compare a token with a very minimal data transfer object. Minimal because the token only contains the data required to identify an object. For our repository, our token looks like this:
1Spotlight::registerTokens(2 SpotlightScopeToken::make('repository', function (SpotlightScopeToken $token, Repository $repository) {3 $token->setParameters(['id' => $repository->id]);4 $token->setText($repository->name);5 })6);
Let's walk through the code above. We use the Spotlight::registerTokens method to register all our tokens.
We use SpotlightScopeToken::make to initiate a new token. This method expects a unique identifier and a closure.
The closure will extract the minimal amount of data we need from our model to identify it in the future.
In this case we want to make sure we add the repository id to our token.
Tokens that are active are also visible to our users but can also be applied (more on this later), for this reason we must also provide a visual identifier.
That's why we use setText and use our repository name so users can identify the repository visually.
Now that we have our token we can use scopes to extract data from our requests and resolve the tokens using the closure we defined earlier.
1Spotlight::registerScopes(2 SpotlightScope::forRoute('repository.show', function (SpotlightScope $scope, Request $request) {3 $scope->applyToken('repository', $request->repository);4 })5);
This scope is resolved whenever the repository.show route is visited by a user.
From the request we extract the repository and apply the token we created earlier.
Now that have our scope and token ready we can continue by defining the query for our token.
This query will run when someone opens the command palette.
Earlier we defined our default query using SpotlightQuery::asDefault, this time we will use SpotlightQuery::forToken.
1Spotlight::registerQueries(2 SpotlightQuery::asDefault(function ($query) {3 //...4 }),5 SpotlightQuery::forToken('repository', function (SpotlightScopeToken $repositoryToken, $query) {6 //...7 }),8);
The SpotlightQuery::forToken method accepts the token identifier we've defined earlier and a closure.
As before, the closure provides us with the user input via the $query variable.
This time, however, you can also access any tokens that have been applied.
You can access a token by using the following naming convention: %name%Token.
Meaning, if you have two tokens called repository and release,
you can access both tokens as follows:
1SpotlightQuery::forToken('repository', function (SpotlightScopeToken $repositoryToken, SpotlightScopeToken $releaseToken, $query) {2 $repositoryToken->getParameters('id'); // Get the repository id3 $releaseToken->getParameters('id'); // Get the release id4});We can use the parameters from our token to return scoped results. Meaning, we can show pages for this specific repository or show related resources. Let's take a look at an example:
1SpotlightQuery::forToken('repository', function (SpotlightScopeToken $repositoryToken, $query) { 2 $pages = collect([ 3 SpotlightResult::make() 4 ->setTitle('Issues') 5 ->setGroup('pages') 6 ->setAction('jump_to', ['path' => route('repository.issues', $repositoryToken->getParameter('id'))]) 7 ->setIcon('page'), 8 ])->when(!blank($query), function ($collection) use ($query) { 9 return $collection->where(fn(SpotlightResult $result) => str($result->title())->lower()->contains(str($query)->lower()));10 });11 12 $releases = Release::query()13 ->where('repository_id', $repositoryToken->getParameter('id'))14 ->where('title', 'like', "%{$query}%")15 ->get()->map(function (Release $release) {16 return SpotlightResult::make()17 ->setTitle($release->title)18 ->setGroup('releases')19 ->setAction('jump_to', ['path' => route('repository.releases', $release->repository_id)])20 ->setIcon('release');21 });22 23 return collect()->merge($pages)->merge($releases);24})
If you would navigate to the repository.show route and open Spotlight you will see the token has been applied.
The results will show the page "Issues" and all releases associated with the repository.
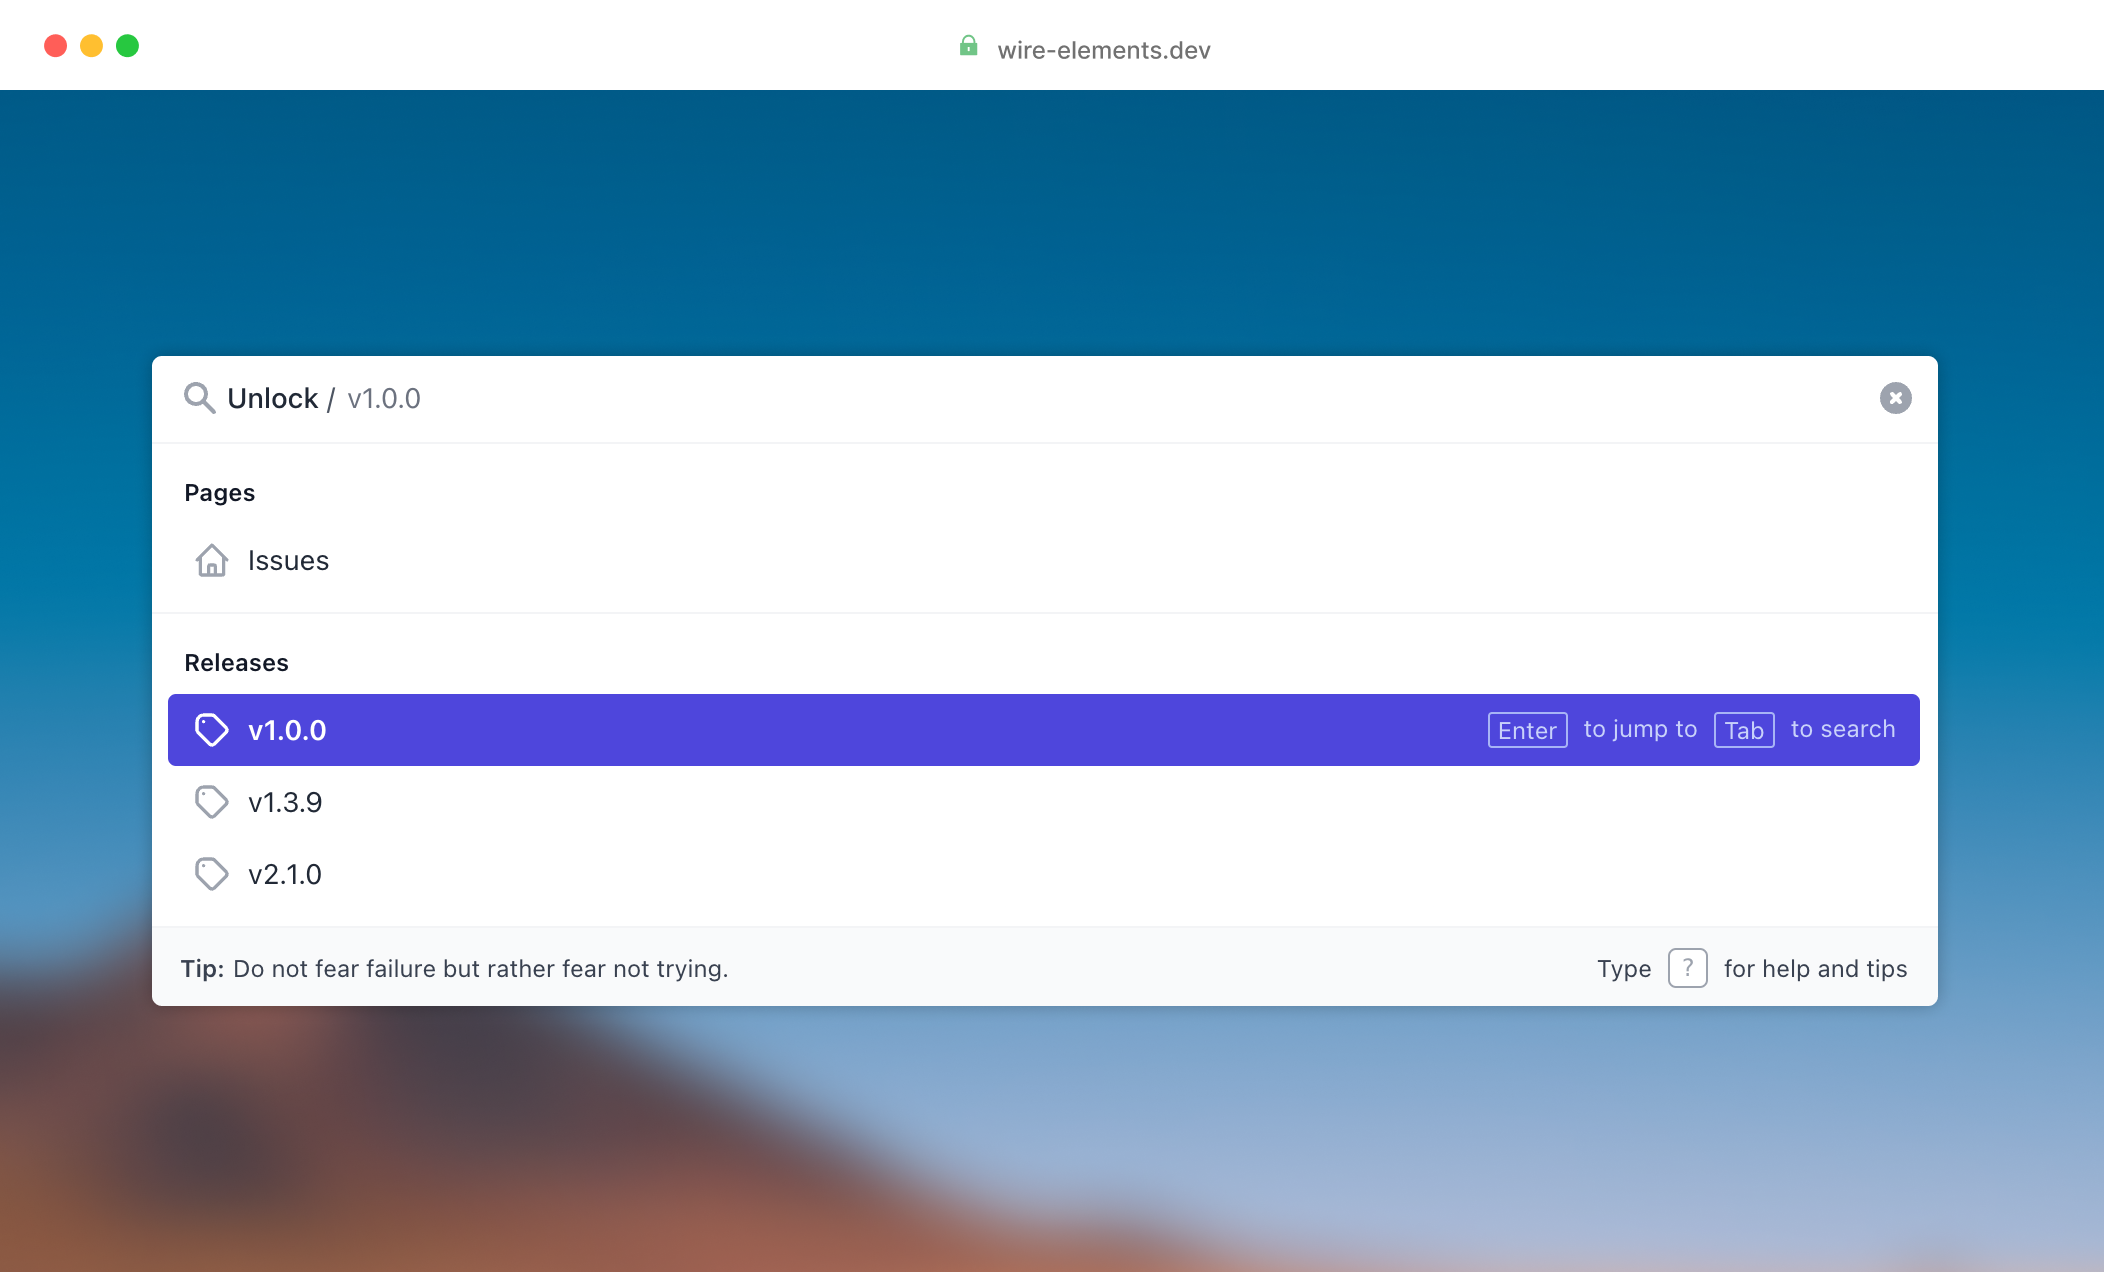
Finally, we will look into applying scopes via user input. Right now, you might have noticed, all results only show 'Enter to jump'. From our query results we might also want to apply the repository scope without having to navigate to given route. Let's head back to our default query and add set the required tokens on the result.
1Spotlight::registerQueries( 2 SpotlightQuery::asDefault(function ($query) { 3 $pages = collect( 4 //... 5 ); 6 7 $repositories = Repository::query() 8 ->when(!blank($query), fn($q) => $q->where('name', 'like', "%{$query}%")) 9 ->get()->map(function ($repository) {10 return SpotlightResult::make()11 ->setTitle($repository->name)12 ->setGroup('repositories')13 ->setAction('jump_to', ['path' => route('repository.show', $repository)])14 ->setTokens(['repository' => $repository]) 15 ->setIcon('repository');16 });17 18 return collect()->merge($repositories)->merge($pages);19 })20);
If you open the command palette now you will notice besides 'Enter to jump' you will see 'Tab to search'.
When you hit the tab key, the token will be applied to the scope.
Modes
You can use the mode feature to allow users to switch between command palette modes. Some examples:
- Type
?to show tips and tricks - Type
#to search issues and pull requests - Type
>to show global commands
To register a mode you can use the Spotlight::RegisterModes method.
1Spotlight::registerModes(2 SpotlightMode::make('help', 'Command palette tips and tricks')3 ->setCharacter('?'),4 SpotlightMode::make('search_issues', 'Search issues and pull requests')5 ->setCharacter('#'),6 SpotlightMode::make('global_commands', 'Global Commands')7 ->setCharacter('>'),8);
Each mode is defined by a unique identifier, a description and a character that triggers given mode.
Please note, if you define a mode with the identifier help, instructions will be shown in the command palette on the bottom right side that explains users they can type ? to get help.
By default, these modes do not return any results. As earlier we have to create a SpotlightQuery that returns helpful tips for our user:
1SpotlightQuery::forMode('help', function ($query) { 2 return collect([ 3 SpotlightResult::make() 4 ->setTitle('Search for issues, pull requests, discussions and projects') 5 ->setTypeahead('Search mode') 6 ->setAction('replace_query', ['query' => '#', 'description' => 'Start command']) 7 ->setIcon('search'), 8 SpotlightResult::make() 9 ->setTitle('Activate command mode')10 ->setTypeahead('Command mode')11 ->setAction('replace_query', ['query' => '>', 'description' => 'Start command'])12 ->setIcon('terminal'),13 ])->when(!blank($query), function ($collection) use ($query) {14 return $collection->where(fn(SpotlightResult $result) => str($result->title())->lower()->contains(str($query)->lower()));15 });16})
Everything looks quite similar but instead of the jump_to action we now use the replace_query action.
This action will replace the users input query with the query we provide in our result. For example, if a user selects the 'Search mode' result.
The input field will be changed to '#' and will trigger the search_issues mode we defined.
When returning results for a specific mode it is not required to set a group on the results. A group has been dynamically created whenever you create a mode. The name of the group will be equal to the mode description. If you want you can of course assign the results to different groups as well.
Random Tips
The bottom left corner of the command palette is able to show random tips. You can register these tips using Spotlight::registerTips:
1Spotlight::registerTips(2 __('Type <kbd>#</kbd> to do magic'),3 __('Be mindful. Be grateful. Be positive. Be true. Be kind.'),4 __('Pursue what catches your heart, not what catches your eyes.'),5 __('Do not fear failure but rather fear not trying.'),6);Toggle Spotlight
If you want to toggle Spotlight using a button you can fire the following event:
1<button wire:click="$dispatch('spotlight.toggle')">Toggle</button>